padme cutting
Finally got the last pieces of the bodice cut 🙂
This was exciting because yes it’s two layers even for these pieces- it looks really weird as a single layer.
But I knew there was some clever use of stretch and basically was able to show it 🙂
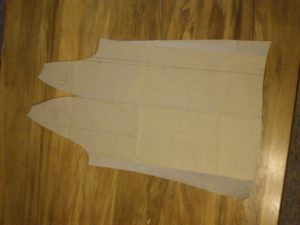
This is a piece from the left side. The curve at the upper left is for the armscye, the gathers are directional to the bust point.
This is the actual shape.
This is what I love about garments like these, they require drafting and draping skills and to not just see fabric as something that is linear 🙂
worth the difficulty
I managed to get a one month subscription to Autodesk Remake (not easy with geo-locking and my country not being specified, and then I wasn’t sure where in the app to put my code (hint- cog-> welcome screen.) but so worth it! I’ll do this again later in the year as I have so much clay and now have a good idea of what the scan will capture.
With 186 photos:
vs the 50 before:
So tomorrow I’ll attempt the full 250 in the backyard (currently a bit swampy- thanks big storms) as this is a marked improvement! Also I’ll possibly even be able to take the horns off my head cast and try them in total isolation as well as get my head cast done.
I may also see if I can get my hands photographed 🙂
I am so wishing I was able to get the texture detail to work, it might make the model easier to capture in fact.
wedding gown musings
Sierra Boggess shared this image yesterday and can you see what has made me so excited? The fabric is thin. Well fairly thin- the flash and angle allows us to see her skin across the arm while the fabric looks more opaque closer to the armscye (where the fabric turns and follows the curve of her shoulder.) The sleeves are either unlined or lined with something very fine while the bodice is flat lined in a solid white.
I tend to double line my bodices and either not line or line my sleeves in a very thin material too.
Also if you follow the lines of the fabric on her sleeve you can see how very shallow the sleeve head is. This is both era appropriate and theatre appropriate as it means you can get your arms over your head. Notice the small wrinkles between shoulder and armscye? Yep. Modern patterns try to eliminate that by using a very tall sleeve head and that is what gives us limited arm range.
The effort to make a garment look good on the stand makes for a garment that is far less practical.
Anyway, just my thought process when I look at new/different images of the same garment 🙂 It’s all about the fit.
Oh and there is probably a bit of ease in the top of the sleeve head, I use three rows of stitches to do this rather than two as it does makes the fine gathers almost invisible.
Barnes is here!!
Henderson Auckland!!!
!!!!!!! I can’t really justify 27kg of the stuff but they have the S foam 130 flex!
http://www.barnesnz.co.nz/polyurethane/s-foam-130-flex-foam-1392
This is what I used for my super squishy and very flexible Togruta headpieces 🙂
It’s a bit tricky when you don’t have a perfect mold that includes headcast but this time I do sort of! This will make the foam fill in the space perfectly 🙂 I can keep my molds!!!
Also this is not what I used but could be ideal for paint:
http://www.barnesnz.co.nz/polyurethane/sc92-single-component-coating-1291
All the latex. For real this time!
I am ready to wear the daggy clothing with all the latex marks today, also to then work on my Cleves frock indoors, or tool the rest of Ahsoka’s armour. Whichever second activity is chosen will be down to working in the room or away from any potential to bump into the latex.
Yes I have done so.
Yes you can readily see this effect on the carpet out there.
They are carpet tiles. Well continuous lengths but the same stuff. So… will try to avoid any slumping anyway and also to cunningly cut the foam to allow for easy fitting once made up.
Mon Mothma seams
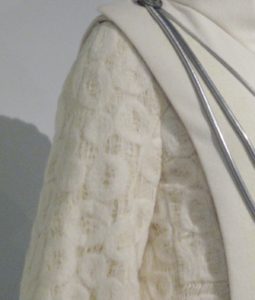
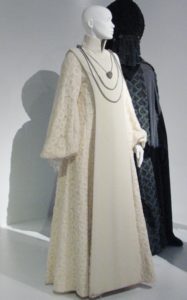
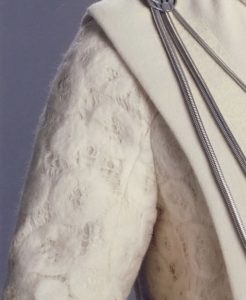
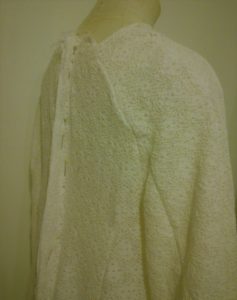
Mothma leapt to the top of the sewing queue due to realising just how complex her robes are. in terms of construction 🙂
Thanks to several sources but mainly Kay Dee:
These photos clearly show the position and shape of the seams. Of note is the shallow princess seam (it is not very curvy) and the seam of the outer sleeve as well as the seam that starts on the arm and turns into a raglan shape. It is to be inferred that it needs to end somewhat near the neck based on how stable the shoulder region is.
The hemming needs to happen asap, the weight of the excess fabric is one issue but the main reason is that the fabric clings to carpet!
latex ALL THE THINGS
Yes, today is dedicated to getting latex in all the molds. Possibly also making latex molds, possibly also getting my last scraps of forex (foamed PVC) and various small costume parts sorted.
But definitely all the latex as I am going to try and get a cast of my Shaak Ti montral as well as Ahsoka 🙂
Mon Mothma progress
I don’t like to use patterns, I find infinitely more success with drafting (more than drafting, and drafting more successful than using an existing pattern.) It has everything to do with modern pattern blocks. In general bodies vary each generation but there is a fashionable shape as well as a fashionable size.
My shape goes against modern fit models in a way that does not conform to the methods of correcting a pattern.
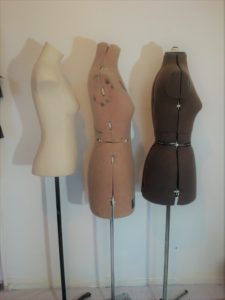
(photos above- three mannequin torsos on narrow stands stood side by side to illustrate differences in shape despite being set to the same size. The mannequin on the left of each photo is covered in white cloth and is not adjustable, the mannequin in the centre is adjustable but is narrower across the chest/waist/hips, but wider in profile, the mannequin to the right is much rounder in all directions and has a much rounder upper back with the armscyes set further forward.
Once again these three mannequins show the different fashion shapes.
Why is this important for Mon Mothma? Isn’t it just a robe?
Nope! She has Raglan sleeves, with four seams each sleeve! Her robes have semi-princess seams (they do not cross the bust point but do terminate in the armscye.)
I do collect vintage patterns when I find useful ones however. Or useful to me 🙂
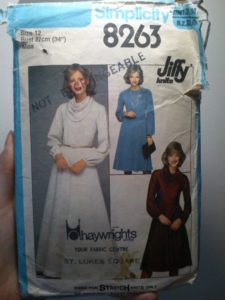
(photo above: a vintage pattern from the 1970s, three women in different variations of the same garment- all with full lower sleeves, semi fitted through the body, and flared skirts)
The dress is unfortunately four panels but has the raglan sleeve to a closed neck 🙂 And bishop sleeves.
The samples are actually much more true than I am used to so I did add too much extra SA when transferring but here is how I did it:
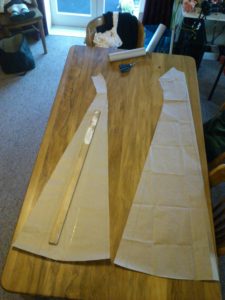
(Photos above: three stages of a pattern alteration, description in following text.)
I transferred all patterns to brown paper. I traces each pattern a short distance from the edge of the paper to allow the paper to be folded straight whereas in the original pattern the dress panels all tapered in to the waist and out to the hem.
For the front dress panel I first drew and then cut a semi princess shape from the front. This left a much narrower side front than I wanted, but the front needed no more work.
I then used double sided tape to stick the outer side of the new side piece to a length of narrow brown paper. I then flared that side seam out about 20cm at the hem and tapered it to the waist.
I repeated on the inside of the side panel.
Now the patter for the dress front has a side seam and a much fuller hem.
I repeated this for the back panels and the sleeves.
(Photo above: traced sleeve pattern on brown paper, parallel lines to divide the pattern into four.)
Since then I have cut the shell fabric and a stabilising lining. The lining is a loosely woven fabric to allow airflow when worn.
I overestimated my seam allowances. The next step will be to assemble this on the form that is going to most easily allow for a semi loose fit but also allow for shoulder shaping. So I shall use the non adjustable mannequin as it has curved upper shoulders at least.
Shaak Ti?
So having practiced so many times with my Ahsoka molds, and previous methods with Shaak Ti.. I may actually be able to use what I have learnt with Ahsoka to use my Shaak Ti molds again 🙂
(Photo above: metal shelves with cement molds of different sizes, bottom shelf supporting in particular the two part molds for Ahsoka Tano and Shaak Ti creature effects.)
This is very exciting. To find a method that creates a predictable latex cast, that is durable and light. I think I may need to do a video guide as if takes both hands, well full body, and is so messy it would ruin my camera equipment to try and get photos.
But it winds up cheaper than a purely slush cast piece with about the same flex and is lighter. I still need to test if the support I used for Shaak Ti will work with this new method, but I do have hope.
(photo above: two part molds resting against a white wall and on grass with exposed topsoil.)
The cast has also not pulled from the molds as much as previous which means it is likely to shrink less. While these molds were relatively easy to work with it may prove more troublesome with the Shaak Ti molds as there are more ridges. But these are exactly why I want to keep using this method- the ridges tend to cause latex to clump into deeper parts of the mold and crete weak thin casts over the higher parts.
Tomorrow I will test it.
This method may also work for Turian jaws and mask 🙂 Right now the flat back cast for the jaws work very nicely.


