Tidying patterns
Before and after sorting and ironing. That poor jumble of lilac card is my Samara pattern. You…
Tidying patterns
Before and after sorting and ironing. That poor jumble of lilac card is my Samara pattern. You…


So.. it’s happening. Finally some good progress on my Lekku of Dooooooom!
Check ‘em out! They reach my knees! Some of the super curve I had in early stages fell out, but I know what I did and I don’t think I could have avoided it under current circumstances.
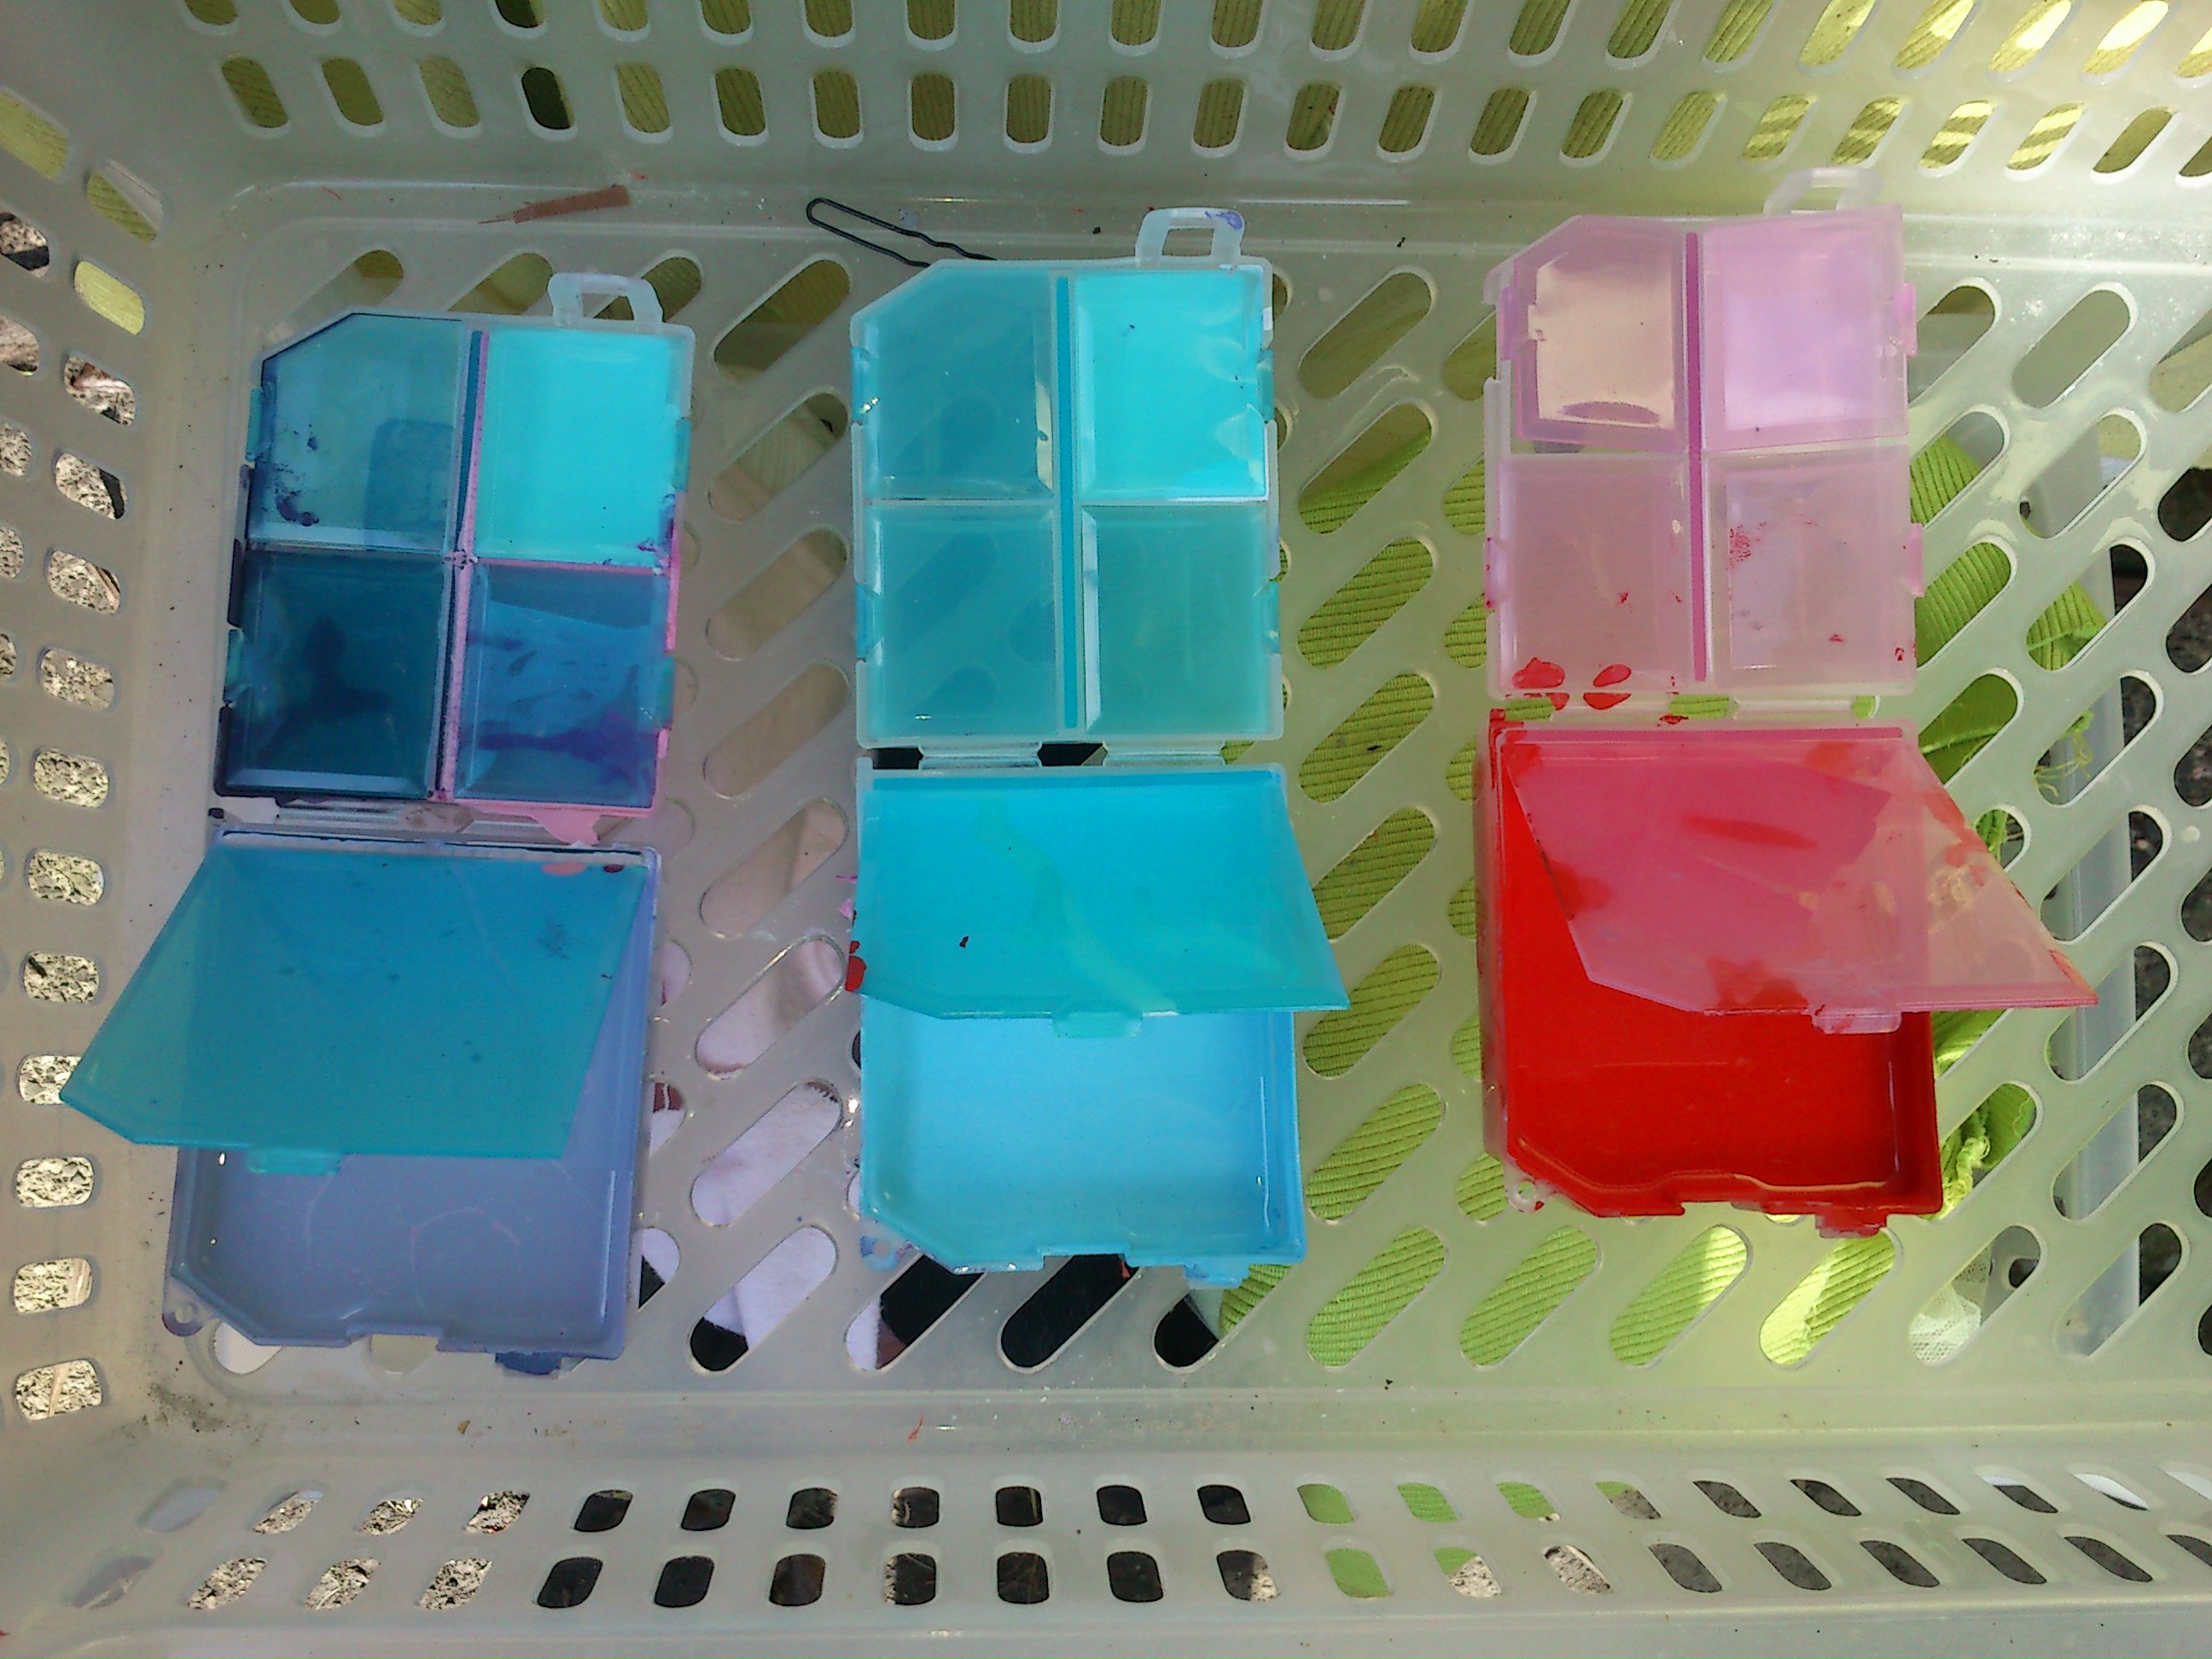
Also photo of my latest purchase! the perfect packable sized containers from the local Daisco (or $3.50 japan shops in Auckland- super excited one opened local to me XD). These are pill containers and I have filled the larger panel with the main body colour for (left to right) Rachi, Liara and Talon/Shaak Ti. The smaller panels I am filling with highlights, liners and colours for patches/markings.
So for Rachi I have (clockwise from top right) pink, white, dark purple and then the final panel will have black for line work.
For Liara (ditto) I have white then will mix similar shading and line work colours (dark blue and black).
For Talon/Shakk Ti I will have two for white and two for black as both require a fair amount of one or the other.
Then I can pack my small carry kit (seen in an earlier post, check the tags (make up) with all the brushes and shading powders in there along with mascara and regular make up..
As a balance of cost type of comparison, you need two NZ Airbrush Tattoos bottle to make about the same as one RC large colour pot. So if you are on a budget you can buy the local stuff and slowly build it up if you are not mixing colours. If you want to head straight into the colour pots then expect to pay about 2/3 extra for shipping. At least if you are buying say 4-6 pots.
Other Talon updates: The strapping has been fixed 🙂 I need to trim some extra bits but the greaves and bracers now have black velcro (don’t ask how I wound up with white as I don’t even know…) and the fixed strapping has been glued down.
I have cleaned the bikini and will need to take in the leggings and gloves. I left the top edge raw as the fabric is scuba stuff so it hard to hem, I am hoping like heck the bikini bottoms still fit as the legs have been hemmed and I don’t fancy unpicking so I can take them in.
The belt still needs to be taken in and I hope I have enough rivets to do so! I may not. I have the snaps but the leather is thick. I am pretty sure I had issues trying to get them to work last time.
Tattoos are being redrawn! I hope to get the line work able to fit fewer pages but if not, I’ll have to use two types of paper. I am flitting between files and artwork and think redrawing them is going to work out the best as I can then use unsharp mask to make sure the edges look hand painted. And the files I made last time were slightly oversized.
So.. it’s happening. Finally some good progress on my Lekku of Dooooooom!
Check ‘em out! They reach my knees! Some of the super curve I had in early stages fell out, but I know what I did and I don’t think I could have avoided it under current circumstances.
Also photo of my latest purchase! the perfect packable sized containers from the local Daisco (or $3.50 japan shops in Auckland- super excited one opened local to me XD). These are pill containers and I have filled the larger panel with the main body colour for (left to right) Rachi, Liara and Talon/Shaak Ti. The smaller panels I am filling with highlights, liners and colours for patches/markings.
So for Rachi I have (clockwise from top right) pink, white, dark purple and then the final panel will have black for line work.
For Liara (ditto) I have white then will mix similar shading and line work colours (dark blue and black).
For Talon/Shakk Ti I will have two for white and two for black as both require a fair amount of one or the other.
Then I can pack my small carry kit (seen in an earlier post, check the tags (make up) with all the brushes and shading powders in there along with mascara and regular make up..
As a balance of cost type of comparison, you need two NZ Airbrush Tattoos bottle to make about the same as one RC large colour pot. So if you are on a budget you can buy the local stuff and slowly build it up if you are not mixing colours. If you want to head straight into the colour pots then expect to pay about 2/3 extra for shipping. At least if you are buying say 4-6 pots.
Other Talon updates: The strapping has been fixed 🙂 I need to trim some extra bits but the greaves and bracers now have black velcro (don’t ask how I wound up with white as I don’t even know…) and the fixed strapping has been glued down.
I have cleaned the bikini and will need to take in the leggings and gloves. I left the top edge raw as the fabric is scuba stuff so it hard to hem, I am hoping like heck the bikini bottoms still fit as the legs have been hemmed and I don’t fancy unpicking so I can take them in.
The belt still needs to be taken in and I hope I have enough rivets to do so! I may not. I have the snaps but the leather is thick. I am pretty sure I had issues trying to get them to work last time.
Tattoos are being redrawn! I hope to get the line work able to fit fewer pages but if not, I’ll have to use two types of paper. I am flitting between files and artwork and think redrawing them is going to work out the best as I can then use unsharp mask to make sure the edges look hand painted. And the files I made last time were slightly oversized.
@masseffect Nyreen progress! Again sorry for bathroom photos but this is the best lit mirror in the house at this time of day and I do not fancy setting my tripod out and all the rigmarole it takes to get my camera to focus when taking self portraits (I need to have a stand in or the camera focuses on the background…. I usually use a Christmas tree stand, vacuum tube and wig head, it can be entertaining)
Anyway so this is the first successful cast! I will be using this but I want to make as many sets as I can before the mold loses too much definition. I love the texture I got on the skull but it will eventually go bye bye. The very last set will be a semi rigid urethane which I will also use to cast my Asari pieces from and any other plaster mold looking a bit dodgy.
Also, I will be using various means to hold pieces together. The pins forced curves not present and the underside of the upper lip sticks out but will be glued flat to the inside. I will be using a lot of velcro dots. They stick very well to latex indeed and will allow for fast removal in case of heatstroke. Cough, not that that happened at the Dragon*Con parade at all… cough. ehem.
I may go try and test the hood pattern. It’s crazy with overlaps and stand up collar and all that jazz.
(ETA: I use @XYZ because I cross post to twitter on this account 😉 )
Oh my Goddess that is a bitchin’ Nyreen mask! I love it!
Thank you XD Indeed it is a Nyreen mask (five parts) currently stalled due to health reasons but I do hope to be able to start cutting out the fabric for her tunic and hood asap.
Aw, I hope whatever health reasons there are clear up soon and don’t reappear. I hope the rest the costume also goes smoothly.
Thank you 🙂 There is a concerted effort to ensure this! Including me taking a break from a few things including costumes I want to do but really don’t need. Nyreen is not one of these! lol! I will though not go mental like I did with Liara and try to make every detail “real” (the silver on her jacket is all applied, the layers are all different and only tacked together where needed). As for the attempt at seaming Samara and Shae Vizla…. yeah not going to do that again 😉 Samara was about 120 pieces not including the buckle strapping).
Still going to attempt airbrushing the design of muscles on the undersuit if I can…
Oh wow. That’s a lot of pieces! But you did a Liara cosplay and a Samara cosplay? I think you just became my cosplay hero!
lol! Thank you 🙂 I am a Bioware fangirl, I was hunting for interesting sci-fi costumes years ago and stumbled across screen caps of the ME crew in the Phoenix armour and just got hooked! When the sneak peaks of Samara came out that was when I got seriously addicted and then finally the SWTOR cinematic with Shae Vizla (or then unknown female Bounty Hunter) I just kind of lost it 😉 You should be able to search tags here to find them, if not I have some tagging to do!


I do goof around a lot…
Alcohol Activated Paints
I kind of leapt right into here after playing with a little Aquacolour and Snazaroo. Both are fine, and in many ways are easier to apply and blend. However I wanted to paint my whole body red. Red in particular transfers badly in body paint. Really really really badly. No matter how well sealed and set. I found this even with PAX (might be because I did insist on added pure pigment powder and not mixing it fully…)
These have a bit of a reputation for being harder to use, but they aren’t 🙂 So long as you know a few tricks, as with everything 🙂
Prep:
First, they are solvent in alcohol (ethanol and Isopropyl Alcohol) but also in the industry standard cleaner Isopropyl Myristate. Which is super expensive in NZ. So it means once dry they are set. You would think this is all kinds of bad for tidy up but it’s not.
I set my work area up with my towels and plastic containers and plastic bags so I can just dump everything in my makup up kit at the end happy to wipe down the surfaces with rubbing alcohol and knowing it won’t keep transfering from cloth to surface to cloth like you get with a wet face cloth. or wastes paper towels. And knowing that the paint on the outside of my bottles/pots/pallets can be cleaned off later but won’t damage my kit.
Types:
There are several brands to use. The ones I use are:
NZ Airbrush Tatoos Mostly for my white based paints. So for Liara and Rachi. It’s a good product, with amazingly fast response from the owners and they pack the bottles nicely. And cost effectively. Also on TradeMe and I may use their auctions next time so I can leave feedback :)These are in liquid form, ready to airbrush. It’s fairly thin so you do need to evaporate off some of the liquid if you want to paint/sponge on.
Reel Creations I live overseas so can’t buy their paints easily, but the liquid form is apparently already mixed to use in airbrushes as well. I buy their Large Color Pots as they are totally evaporated and so don’t pose a risk to shipping by air. Oh heck, I worked out how much they cost in NZ dollars. But it’s about $24 each including shipping? But one pot of red lasted multiple applications for Darth Talon including the lekku.
harder to remove than the above but still needs hot water and soap at least. IM is best and IA works. Just avoid the face.
Latonas which seems to have changed their bottles and maybe formulation? This is close to PAX as you can get without being PAX. It is/was half diluted, so you need to thin it for airbrush but works well as is to sponge on appliances. It is super durable. I did my underarms and butt/thighs as Talon and I looked like I had red boy shorts on the entire time at C6 and some way in to D*C. Even with IM to remove it.
Storage:
In all cases I prefer to pour them out into a flat container and evaporate them off so I can use them like a mix between cake make up and watercolour. But using alcohol vs water 😉
Colour mixing:
I like to buy the red as is as well as the black in all the above and use as is- my lekku are tinted vaguely transluscent within my own skin shades so it refracts light in a similar way to my skin. It’s not perfect but the red is slightly transluscent so is better than not.
I do however buy a lot of white and mix to make the Asari blues and pastel to mid tone shades where possible. This is because I can then be sure they are all equally opaque (some inks are opaque some are transluscent) and equally mixable in to each other.
To do this I have pure pigment from the art store. The skull and bones on the bottles is not because the product is toxic but is so finely milled you do not want to breathe it in! So I get my dust mask, and spriitz the top of the bottle with alcohol to keep stray particles from being breathed in and mix directly in my bottles/containers.
I use a col blue and warm blue, opaque yellow and a “red” that is actually pink and a true red. And also Titanium white as it is a base for cosmetics.
I check my mixes regularly and give a stir every so often after mixing and during the evaporation process as the colour pigments rise and the white/fillers sink. This is also why the paints can look darker once dry than in the bottle/pot.
I also mix street shadow with these pigments to intensify them as you need strong colours to shade with.
To use:
First prep the skin:
Shave/defoliate every hair from everywhere you can.I forget this as my hair is so fine and blonde but when I do it gives such a good result. So I will put my hair in a pony tail and use depilatory cream around my hairline and back of neck. These fly away hairs at the back are about 10cm long and can cause issues with gluing bald caps. But you might be suprised how fluffy you are near your hair line!
And then I use tweezers on my brows and upper lip and even my epilady if I am brave. I didn’t do my brows or lip for Rachi and in person you could tell, not so much in photos though! If you forget the hairs will get coated in paint and stick out like bristles.
Moisturise as usual but use a dry cloth after and wipe off any excess. Moisturiser and AA paint do not mix.
Application:
I have an airbrush but it is better for detail work and I rely on canned air so it’s not economically feasable atm. Also it’s toploaded so makes it hard to self paint faces! So I use a large filbert type brush. Starting on the cheeks and nose and working towards the jawline and neck then across the forehead and down to the brows, finally dabbing with the same brush with minimal paint and minimal alcohol towards the eyes. I do paint over my lids but it’s usually lighter than elsewhere and I avoid my brows as much as possible.
Shading:
For Talon this was pretty much it except some minor shading at the eyes and of course the painting of the tattoos… I only hand painted the face and lekku, my body tattoos were transfers. Very expensive, fiddly but if done right works really well. It’s about $50 an application atm. I hope I can get that down and also to get my tattoos a little more finetuned. I am not happy to share my graphics as I did use Jan’s work so much on this. However I will ask her permission once they are actually okay to convert to PDF as I know it would help a lot of Talons in the waiting.
For Liara and Rachi though I then got stippling with a sponge and the pallettes. Lots of white for Liara on the nose and jawline and cheeks and a little pink on the eyes.
I use a range of sponges. For liara I used the defolitaing side of the depilitory sponge as it is very open celled and very firm. This makes for a light freckly type of effect.
For Rachi I used a latex wedge for the cheeks as it lays down a lighter but more easily blended layer of colour.
For Rachi and Liara I also wear aggressive lashes! There is always a gap between lash line and lashes so once in place I use a very long pointed brush and use the very tip to fill in tat line. And then also top the lashes.
For the eyes I also use black to line under the eye and bend with a colour I use to shade. So for Liara this is a purple as well as pink. And use white abover the liner on my upper lashes before getting the pink/other pastel shader over it. And also a little white directly under the brow. Again i will over colour with another pastel if it is too stark.
I also paint in my brows with a fine brush and black paint usually. Twi’lek and Asari are reptilian essentially so their brows look painted in anyway.
The good news is you cannot go too far. Once you look painted you look painted. You may as well use every trick in the book to make your eyes look bigger, give definition to your jaw and cheeks as you can.
I basically use old theatre make up tricks in the alien colours to counter the flattening effect of opaque colour.
To remove:
I have used a few abbreviations so here they are all consolidated 🙂
Fill a basin with hot hot water. Put in your face cloth. Take out and wring then put on your face. This is like having a nice steam facial and helps by getting your face sweating. Do this a few times and be careful. You want that theraputic heat not scalding heat!
Next use same face cloth with a gentle soap. Gently use the cloth and soap on your cheeks and jaw and the less sensitive areas.
If this has been going well you won’t need to try the next but you may…
For my hands I spritz with IA (Isopropy Alcohol) or ethanol (“meths” in NZ though no methanol is involved any more thank goodness) and use a hot facecloth again and scrub. I kind of beat up my hands anyway.
I will also use IA/ethanol on my neck and arms etc. But I avoid my face and also any areas I have pulled PA from (edges of latex appliances). Well I do *now*. Lesson leart the hard way!
For the face I also use a good big dollop of Aveeno and work then in to the skin already cleaned and in to the edges of the paint to help lift it. The heat from the face cloth, the moisturiser and gentle buffing action will remove most. (I use this to remove street make up too).
But if you have some Isopropyl Myristate (IM) this is the ideal time to use it.
It is oily and mega effective so always keep it separate from your main kit and well sealed. IA/ethanol with dissolve the paint and then evaporate leaving the paint actually still usable (if you can get at it). IM does not. I suspect it joins to the binder like an emollient so one end is soluble in oil and the other in alcohol and even water. So a forever solution.
Baby oil helps but it is a mechanical action with massage and heat helping.
If you use IM or baby oil remember to also then clean your face with a gentle cleanser and use your moisturiser. They are oily so can clog pores.
Sorry for huuuuuuge wall of text! I could have broken this up as well 😉